By: AY1920S2-CS2103T-W13-3 Since: Jan 2020 Licence: MIT
- 1. Introduction
- 2. Setting up
- 3. Design
- 4. Implementation
- 4.1. Dependency between Module and Personal
- 4.2. Structure of Command Features
- 4.3. New Profile Feature
- 4.4. Add Module / Task Feature
- 4.5. Edit Profile / Module Feature
- 4.6. Show Profile / Module / Semester / Course / Focus Area Feature
- 4.7. Delete Profile / Module / Task / Grade Feature
- 4.8. Help Feature
- 4.9. Home Feature
- 4.10. Logging
- 4.11. Configuration
- 5. Documentation
- 6. Testing
- 7. Dev Ops
- Appendix A: Product Scope
- Appendix B: User Stories
- Appendix C: Use Cases
- Appendix D: Non Functional Requirements
- Appendix E: Glossary
- Appendix F: Instructions for Manual Testing
- F.1. Launch and Shutdown
- F.2. Creating a new profile
- F.3. Deleting a profile
- F.4. Adding a module
- F.5. Deleting a module
- F.6. Adding a deadline
- F.7. Deleting a deadline
- F.8. Setting the grade of a module
- F.9. Deleting the grade of a module
- F.10. Editing the name of a profile
- F.11. Editing the course of a profile
- F.12. Editing the focus area of a profile
- F.13. Editing the semester of a module
- F.14. Editing a task of a module
- F.15. Showing module overview
- F.16. Showing semester overview
- F.17. Showing module information
- F.18. Showing course information
- F.19. Showing focus area information
- F.20. Returning to home screen
- F.21. Resetting MODdy
- F.22. Saving data
- Appendix G: Effort
1. Introduction
Welcome to MODdy’s Developer Guide! This document is to help you understand the implementation of MODdy and its features better.
| Feel free to open an issue in our issue tracker if you have any questions, features suggestion or bugs to report. |
2. Setting up
This is a guide on how to set up MODdy as a project on your computer.
Refer to the guide here.
3. Design
This section describes some noteworthy details on how different components in MODdy work together.
3.1. Architecture
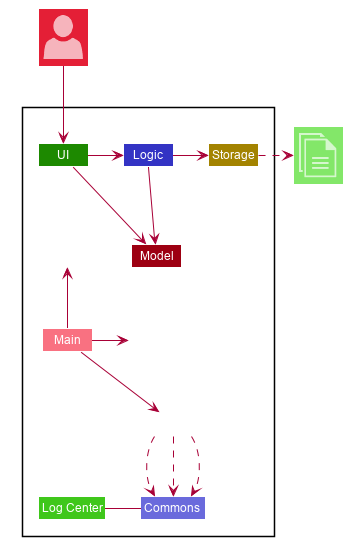
The Architecture Diagram given above explains the high-level design of the App. Given below is a quick overview of each component.
The .puml files used to create diagrams in this document can be found in the diagrams folder.
Refer to the Using PlantUML guide to learn how to create and edit diagrams.
|
-
At app launch: Initializes the components in the correct sequence, and connects them up with each other.
-
At shut down: Shuts down the components and invokes cleanup method where necessary.
Commons represents a collection of classes used by multiple other components.
The following class plays an important role at the architecture level:
-
LogsCenter: Used by many classes to write log messages to the App’s log file.
The rest of the App consists of four components.
Each of the four components
-
Defines its API in an
interfacewith the same name as the Component. -
Exposes its functionality using a
{Component Name}Managerclass.
For example, the Logic component (see the class diagram given below) defines it’s API in the Logic.java interface and exposes its functionality using the LogicManager.java class.
How the architecture components interact with each other
The high-level Sequence Diagram below shows how the components interact with each other for the scenario where the user issues the command delete n/John.
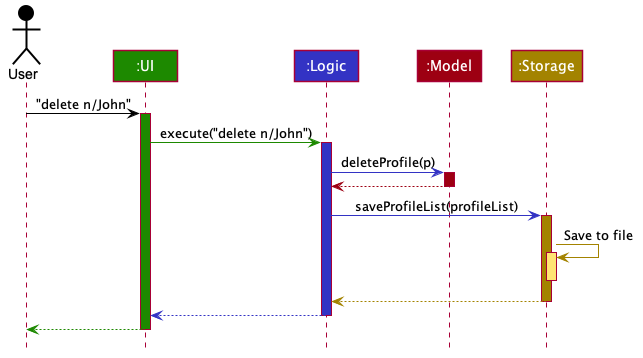
delete n/John commandThe sections below give more details of each component.
3.2. UI component
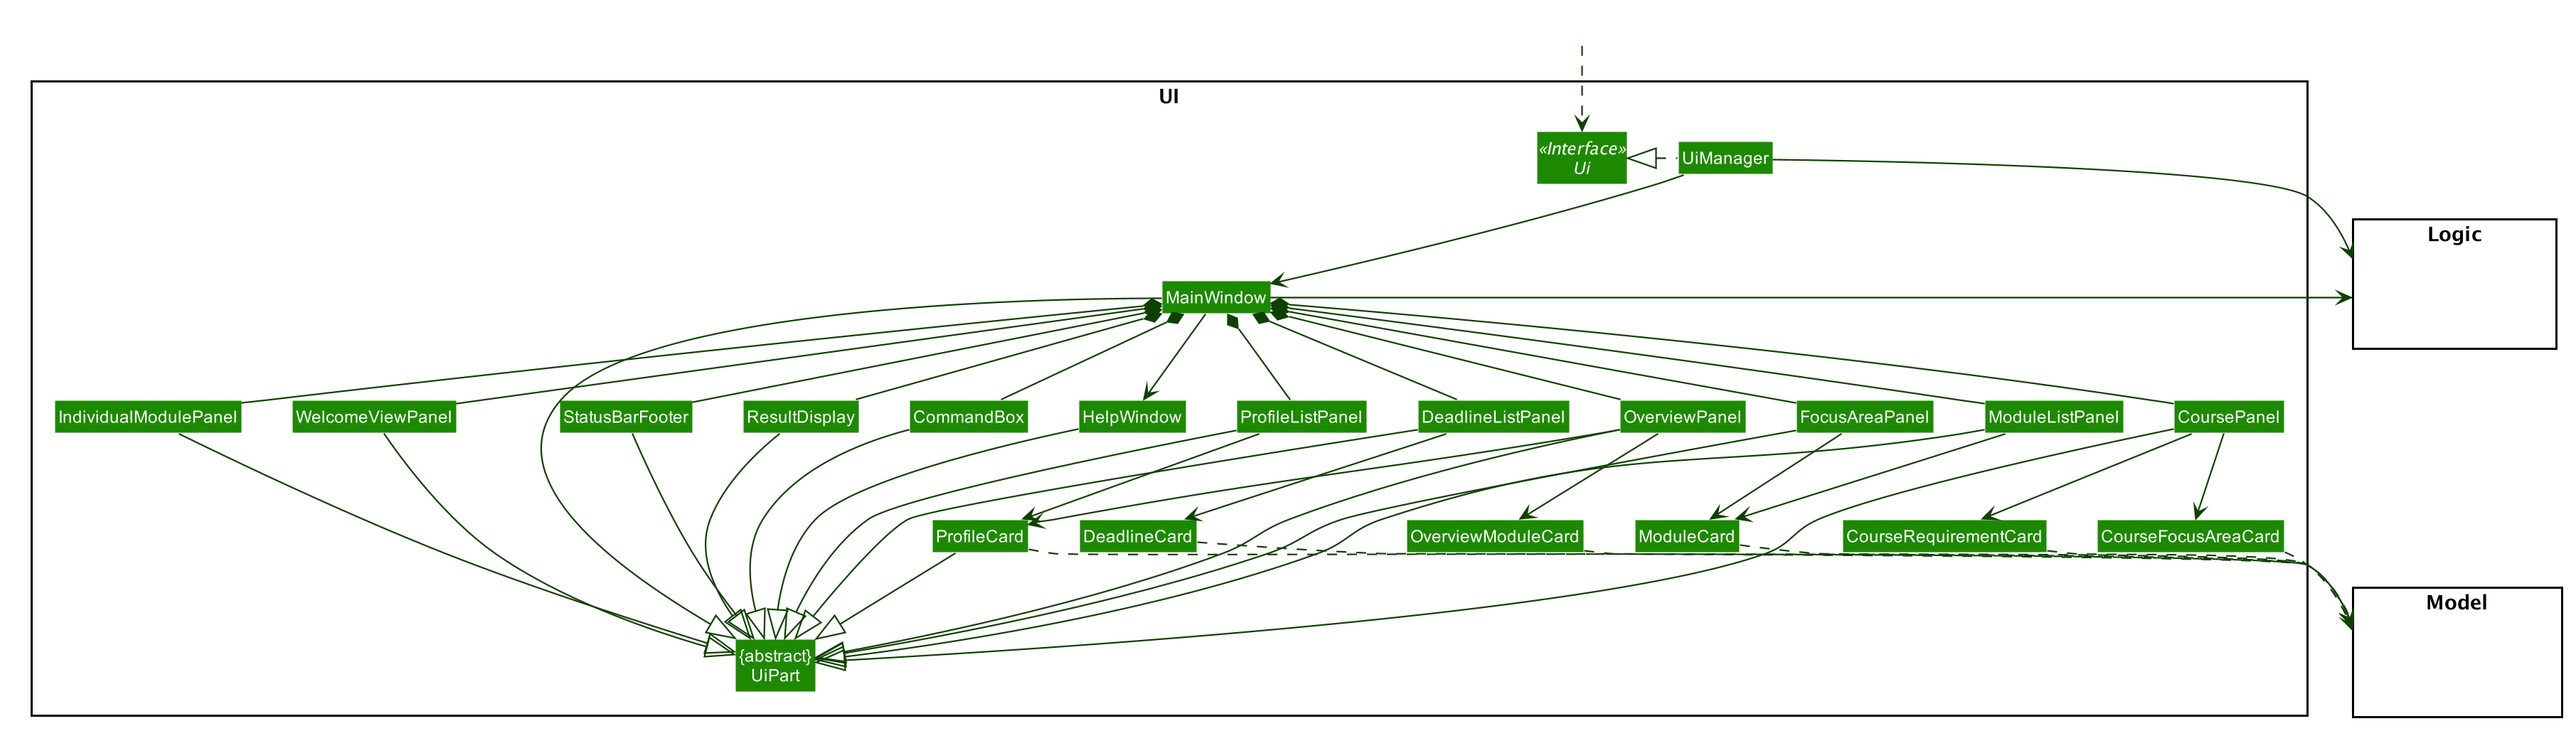
API : Ui.java
The UI consists of a MainWindow that is made up of parts namely CommandBox, ResultDisplay, ProfileListPanel, DeadlineListPanel,
CoursePanel, FocusAreaPanel, IndividualModulePanel, OverviewPanel, ModuleListPanel, WelcomeView, HelpWindow and StatusBarFooter.
All these, including the MainWindow, inherit from the abstract UiPart class.
The following panels are made up of one or more parts. For example,
-
ProfileListPanelconsists ofProfileCard, -
DeadlinePanelconsists ofDeadlineCard, -
OverviewPanelconsists ofProfileCardandOverviewModuleCard, -
ModuleListPanelconsists ofModuleCard, -
FocusAreaPanelconsists ofModuleCard, -
CoursePanelconsists ofCourseFocusAreaCardandCourseRequirementCard.
The UI component uses JavaFx UI framework. The layout of these UI parts are defined in matching .fxml files that
are in the src/main/resources/view folder. For example, the layout of the MainWindow is specified in MainWindow.fxml
The UI component,
-
Executes user commands using the
Logiccomponent. -
Listens for changes to
Modeldata so that the UI can be updated with the modified data.
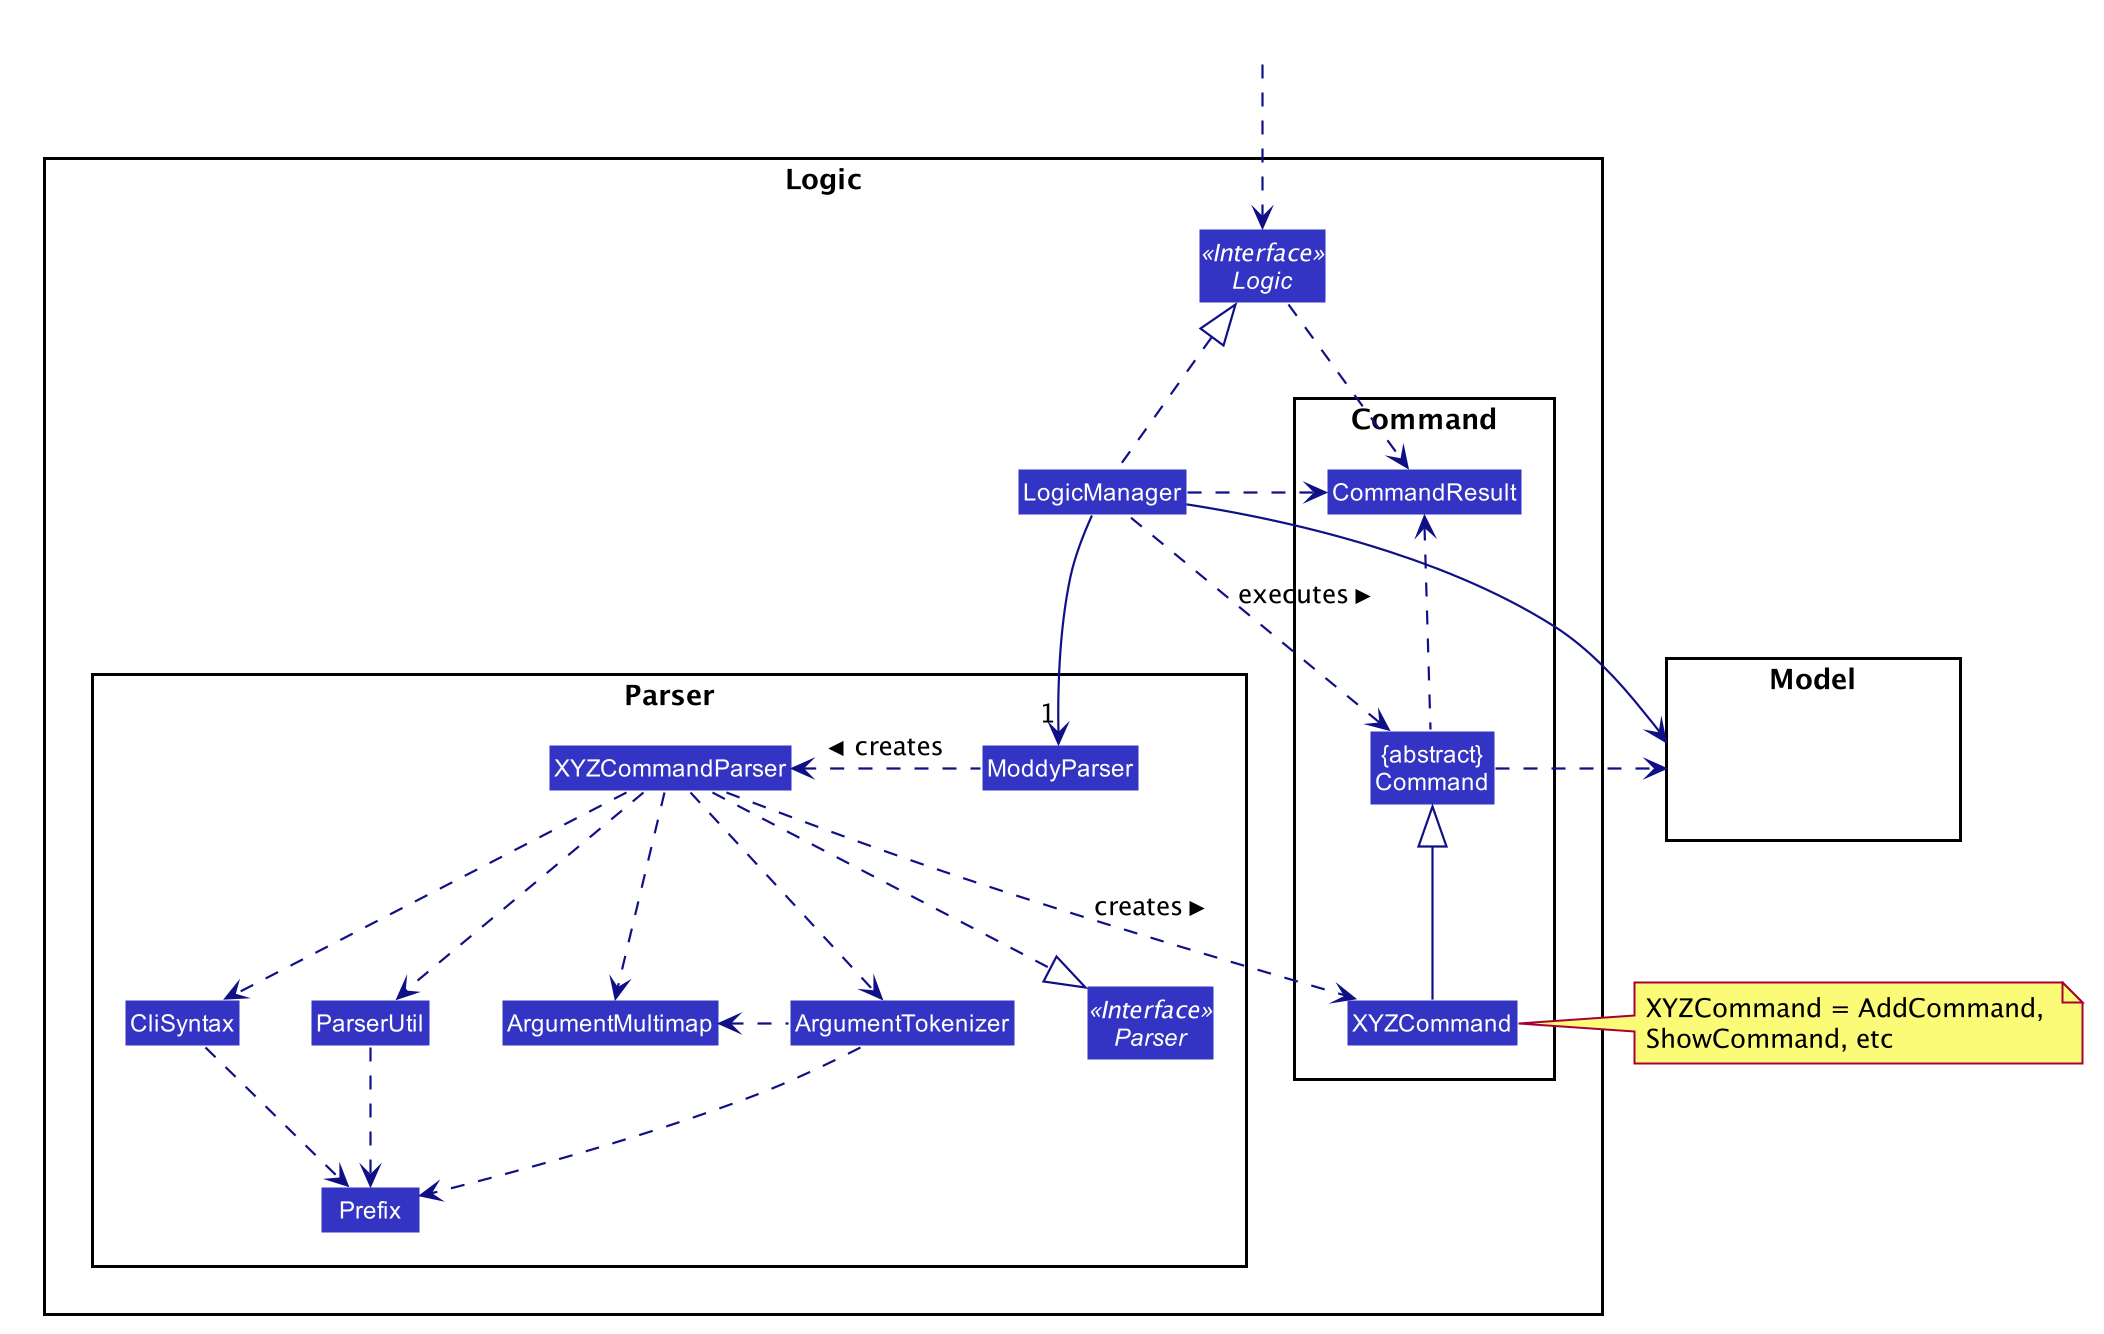
3.3. Logic component
API :
Logic.java
-
Logicuses theModdyParserclass to parse the user command. -
This results in a
Commandobject which is executed by theLogicManager. -
The command execution can affect the
Model(e.g. adding aModule). -
The result of the command execution is encapsulated as a
CommandResultobject which is passed back to theUi. -
In addition, the
CommandResultobject can also instruct theUito perform certain actions, such as displaying help to the user.
Given below is the Sequence Diagram for interactions within the Logic component for the execute("delete m/CS2101 t/work") API call.
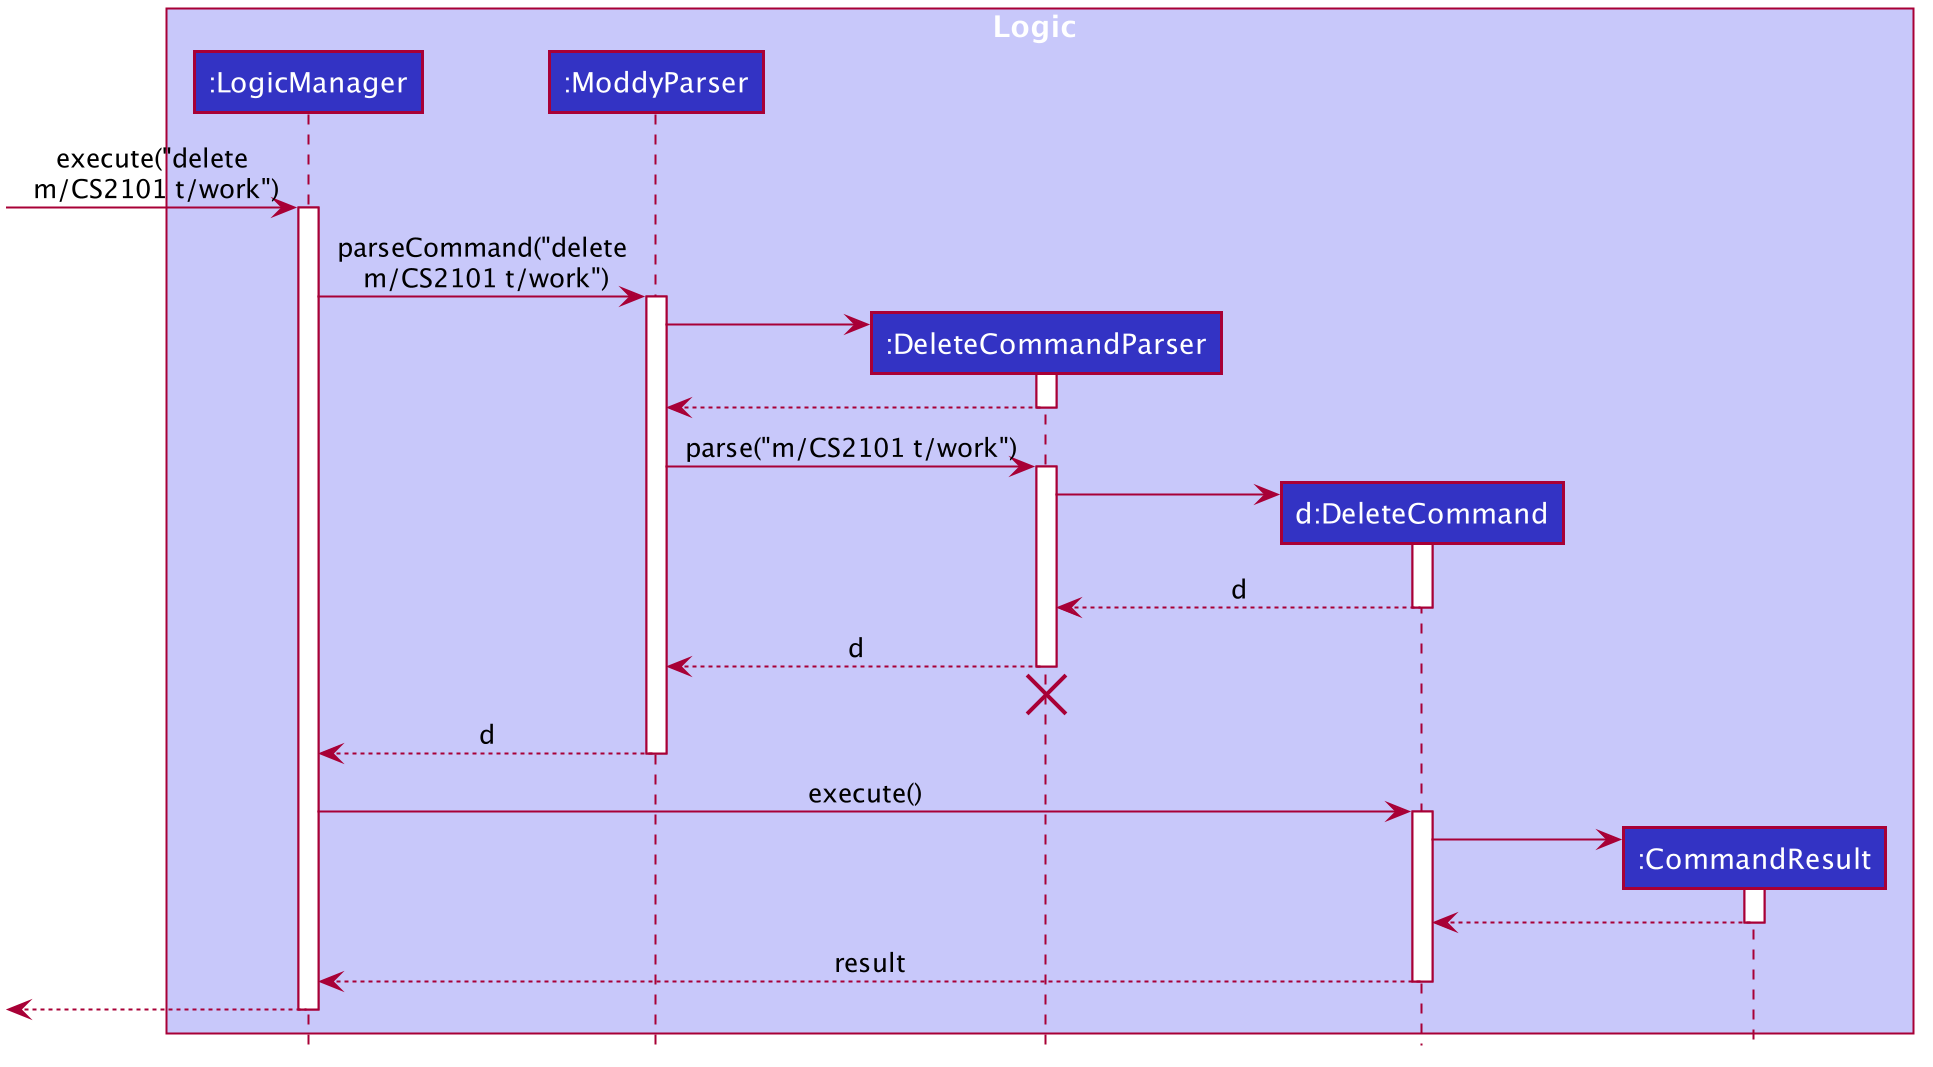
delete m/CS2101 t/work Command
The lifeline for DeleteCommandParser should end at the destroy marker (X) but due to a limitation of PlantUML, the lifeline reaches the end of diagram.
|
3.4. Model component
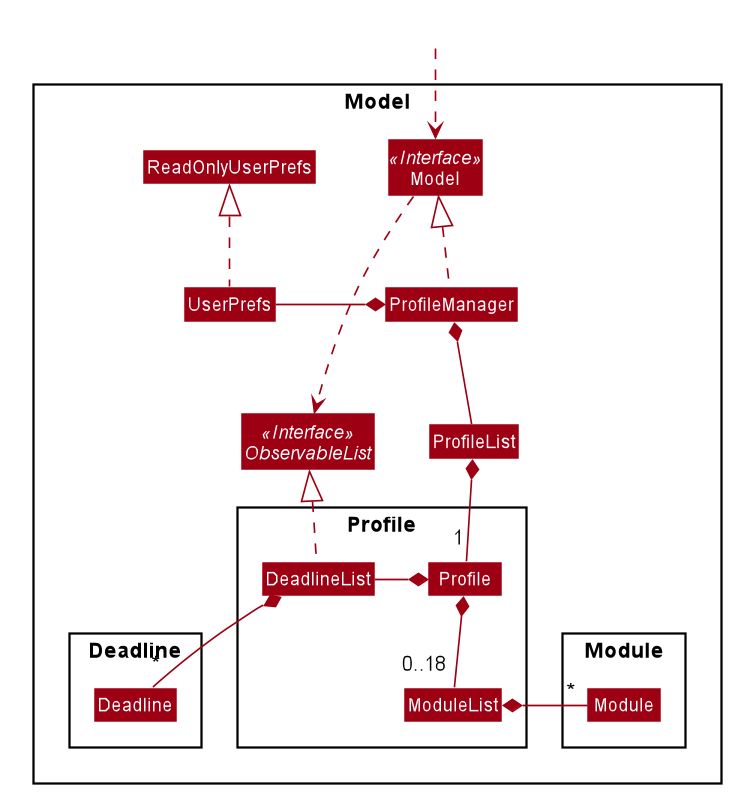
The Model,
-
stores a
UserPrefobject that represents the user’s preferences. -
stores the profile data.
-
stores a
ModuleListof modules taken in each semester in aHashMap -
exposes an unmodifiable
ObservableList<Deadline>that can be 'observed' e.g. the UI can be bound to this list so that the UI automatically updates when the data in the list changes. -
does not depend on any of the other three components.
3.5. Storage component
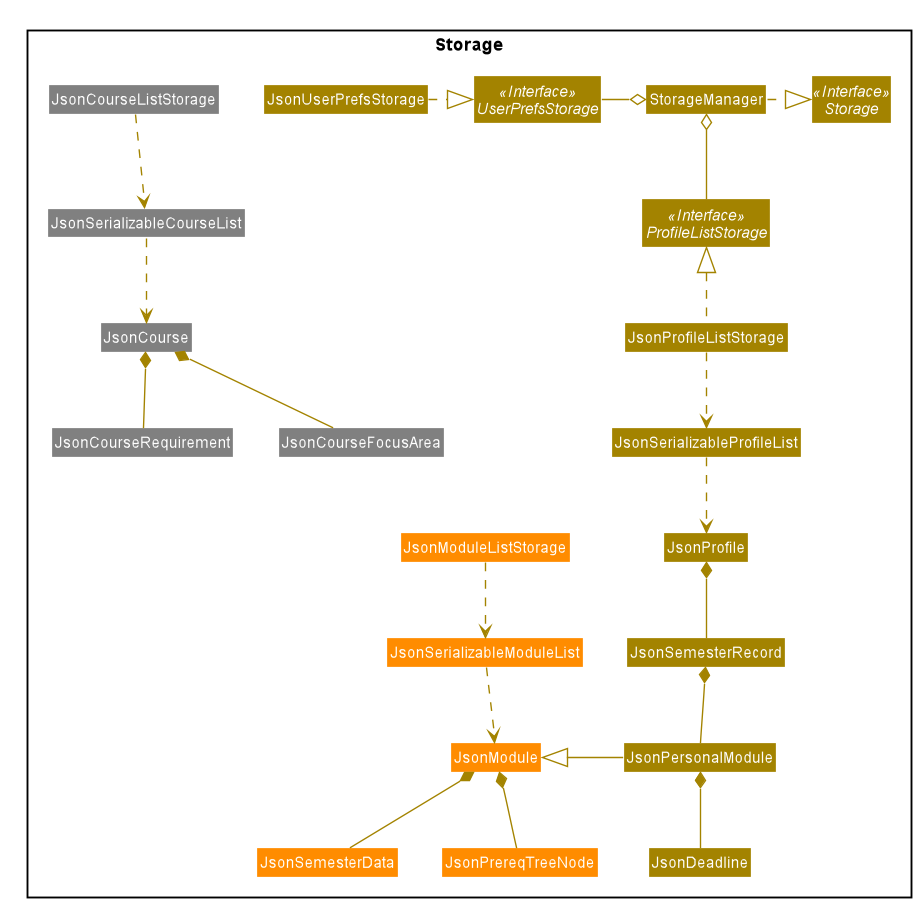
API : Storage.java
The Storage component consists of the following three main parts:
-
Profiles:
JsonProfileListStoragehandles reading and saving of profiles from JSON toProfileobjects and vice versa. TheProfileobjects are stored in aProfileList. -
Modules:
JsonModuleListStoragehandles only reading of modules from JSON toModuleobjects, which are stored in aModuleList. -
Courses:
JsonCourseListStoragehandles only reading of courses from JSON toCourseobjects, which are stored in aCourseList.
The Storage component,
-
can save
UserPrefobjects in JSON format and read it back. -
can save the Profile List data in JSON format and read it back as a
ProfileListobject. -
can read Module List data from JSON format to a
ModuleListobject. -
can read Course List data from JSON format to a
CourseListobject.
3.6. Common classes
Classes used by multiple components are in the seedu.address.commons package.
4. Implementation
This section describes some noteworthy details on how certain features are implemented.
4.1. Dependency between Module and Personal
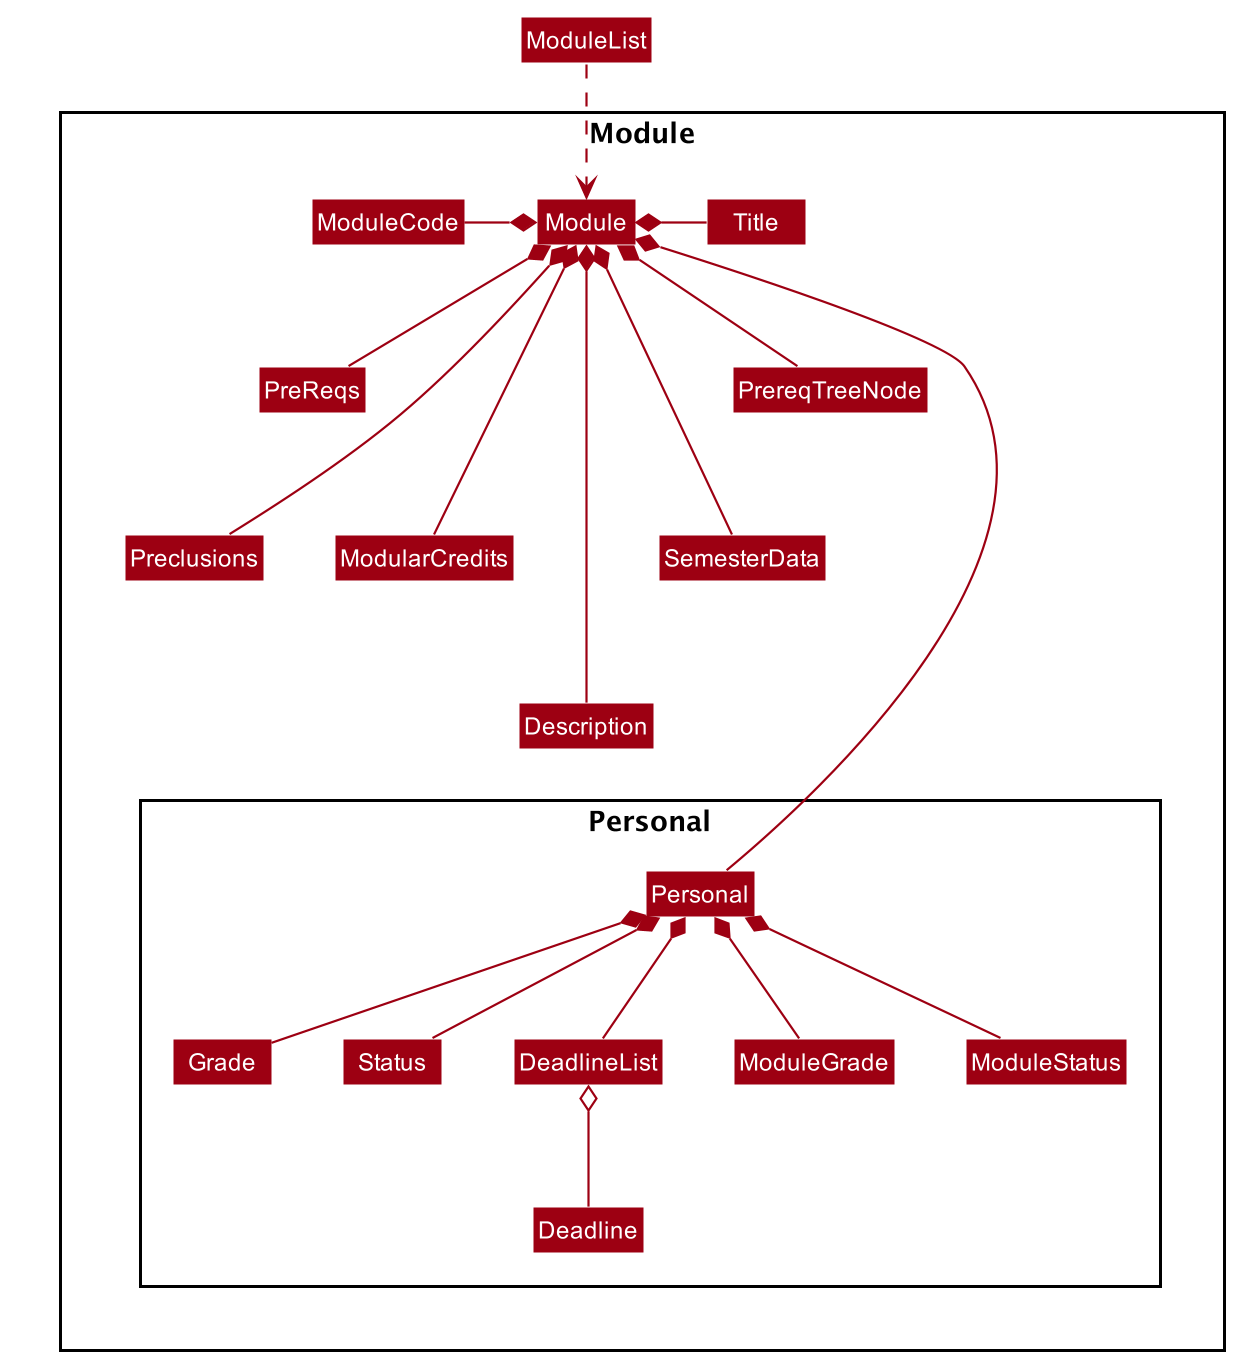
Each Module class consists of a Personal class, alongside other module attributes from NUSMODS. In each Personal class, there are 3 attributes that are for the user to store their data:
-
Grade: the user’s grade for the particular module -
Status: the status of the module (COMPLETED, IN_PROGRESS, PLANNING) -
DeadlineList: a list ofDeadlinetasks added by the user
These attributes were included in Personal as they are the attributes that are personal to the user, and which the user can edit at any time.
ModuleGrade and ModuleStatus are enumeration classes that store valid grades and module statuses.
4.2. Structure of Command Features
The Command features in MODdy all extends from a single abstract class Command. A specific Command object created is executed by the LogicManger using the respective Parser, which then returns a CommandResult object and provides the result of that Command feature.
The following class diagram shows the implementation of MODdy’s Command features:
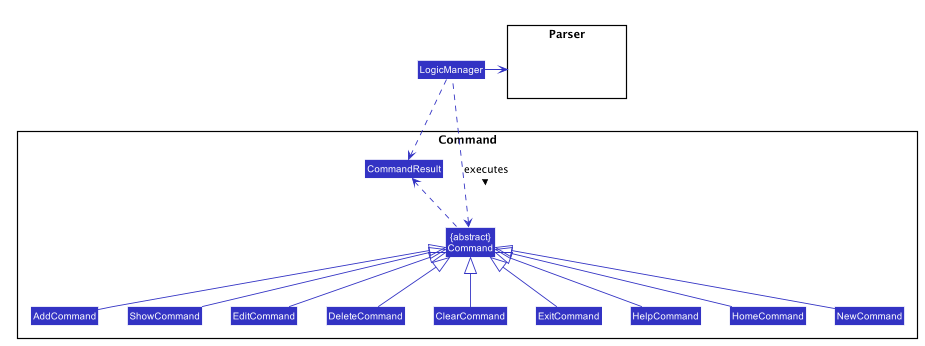
CommandThe sections below gives more details on each Command feature.
4.3. New Profile Feature
The new feature allows the user to create a Profile with the command new, appended with the tags.
The tags are:
-
n/nameforName -
c/courseforCourse -
y/currentYear.currentSemesterfor current year and semester -
f/focusAreaforFocusArea
4.3.1. Current Implementations
NewCommand extends from the Command class and uses the inheritance to facilitate the implementation. NewCommand is parsed using NewCommandParser to split the user input into relevant fields.
The following sequence diagram shows how the new operation works with the input: new n/John c/Computer Science y/2.2.
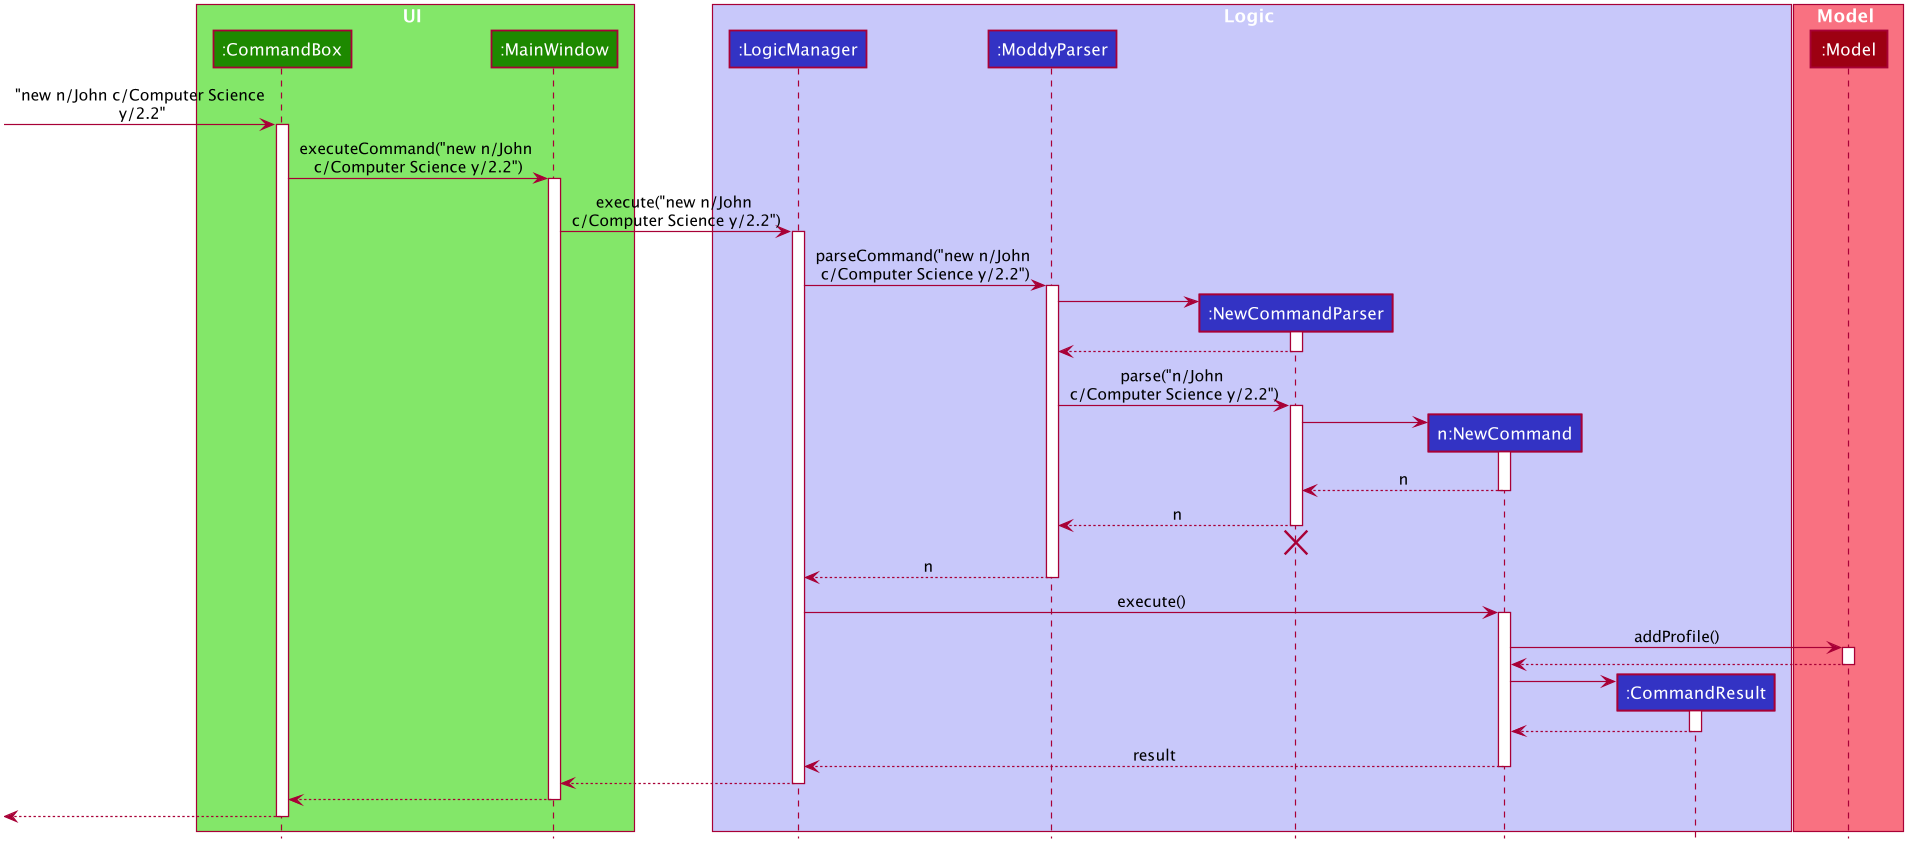
new n/John c/Computer Science y/2.2 command4.3.2. Design Considerations
-
Alternative 1 (current choice): Use the
y/year.semestertag like all other commands-
Pros: More intuitive for user (only one tag related to year and semester).
-
Cons: Harder to convey the idea that it has to be current year and current semester to user.
-
-
Alternative 2: Have an additional tag
cs/currentYear.currentSemesterinstead ofy/year.semesterto identify the year and semester user is in-
Pros: Easier to differentiate the current year and semester user is in among all
y/year.semestertags. -
Cons: More tags to parse, and also less intuitive for user (have to use both
cs/andy/).
-
Eventually, we decided on alternative 1 to prioritize user-friendliness and cleaner code.
4.4. Add Module / Task Feature
The add feature allows the user to add a Module and a Task with a Deadline for an existing module with the command add, appended with the tags.
The tags are:
-
m/moduleCode y/year.semester [g/grade]for adding a module -
m/moduleCode y/year.semester t/task [d/deadline]for adding a task to an existing module
Multiple modules can be added at once but only to the same year and semester, e.g. add m/CS1231 m/IS1103 m/MA1521 y/1.1.Multiple tasks can be added at once but only to the same module, e.g. add m/CS1231 t/tutorial d/2020-04-20 18:00 t/assignment d/2020-04-25 23:59. |
g/grade is optional.However, grades cannot be added when adding multiple modules. |
d/deadline is optional.However, for multiple tasks, as long as one Task has a Deadline, all t/task tags have to be appended with d/deadline tags. For the tasks with no deadlines, the tag can just be d/.
|
4.4.1. Current Implementations
AddCommand extends from the Command class and uses the inheritance to facilitate the implementation. AddCommand is parsed using AddCommandParser to split the user input into relevant fields.
The following sequence diagram shows how the add operation works with input: add m/CS2105 y/2.2.

add m/CS2105 y/2.2 command4.4.2. Design Considerations
Aspect 1: How modules are added
-
Alternative 1 (current choice): Add multiple
Moduleobjects with oneAddCommand-
Pros: More convenient for the user.
-
Cons: Inconsistent with other commands, which can only take in one similar object with one
Command.
-
-
Alternative 2: Add only one
Moduleobject with oneAddCommand-
Pros: Easier to implement and consistent across all commands.
-
Cons: More to type if user intends to add multiple
Moduleobjects.
-
Eventually, we decided on alternative 1 for the convenience of the user since the number of modules taken per semester is not low.
Aspect 2: How Deadline feature is implemented
-
Alternative 1 (current choice): The
dateis compulsory whiletimeis optional for adeadline-
Pros: Gives user the flexibility to input different types of tasks.
-
Cons: More bugs in
deadlinerelated method calls.
-
-
Alternative 2: Both
dateandtimeis compulsory for adeadline-
Pros: Easier to implement since both date and time will be parsed.
-
Cons: Some tasks do not have a timing that it must be completed by, making it not user-friendly.
-
Eventually, we decided on alternative 1 for the benefits of the user. To tackle the cons, we have set time to be "23:59" by default if user did not specify.
4.5. Edit Profile / Module Feature
The edit feature supports the editing of both Profile and Module. Profile is edited with the command edit and Module is edited with the command edit appended with m/moduleCode.
The edit profile feature is a complementary feature to the new profile feature. It allows the user to edit their profile that was created at the start. Profile features such as name, course, current year/semester and focus area can be edited using this command.
In addition, the edit module feature is a complementary feature to the add module feature. It allows the user to edit a module that has previously been added. The user can edit module information such as the semester it is taken and grade.
Lastly, the edit deadline feature is a complementary feature to the add deadline feature. It allows the user to edit a deadline that has previously been added to a module. The user can edit deadline information such as its description, date and time.
To edit the profile, the command edit should be appended with one or more of the tags:
-
n/name: New name -
c/course: New course -
y/year.semester: New current year/semester -
f/focusArea: New focus area
To edit a module, the command edit should be appended with m/moduleCode, followed by one or more of the tags:
-
y/year.semester: New year/semester where module is taken -
g/grade: New grade for the module -
t/task: Old task description-
nt/newTask: New task description -
d/deadline: New date and time
-
To edit a deadline that has previously been added, append edit m/moduleCode with t/task which is the description of the task to be edited, followed by either nt/newTask which is the new description of the task and/or d/deadline which is the new deadline that will replace the existing one.
4.5.1. Current Implementations
EditCommand extends from the Command class and uses the inheritance to facilitate the implementation. EditCommannd is parsed using EditCommandParser to split the user input into relevant fields.
The following sequence diagram shows how the edit command works: edit n/John:
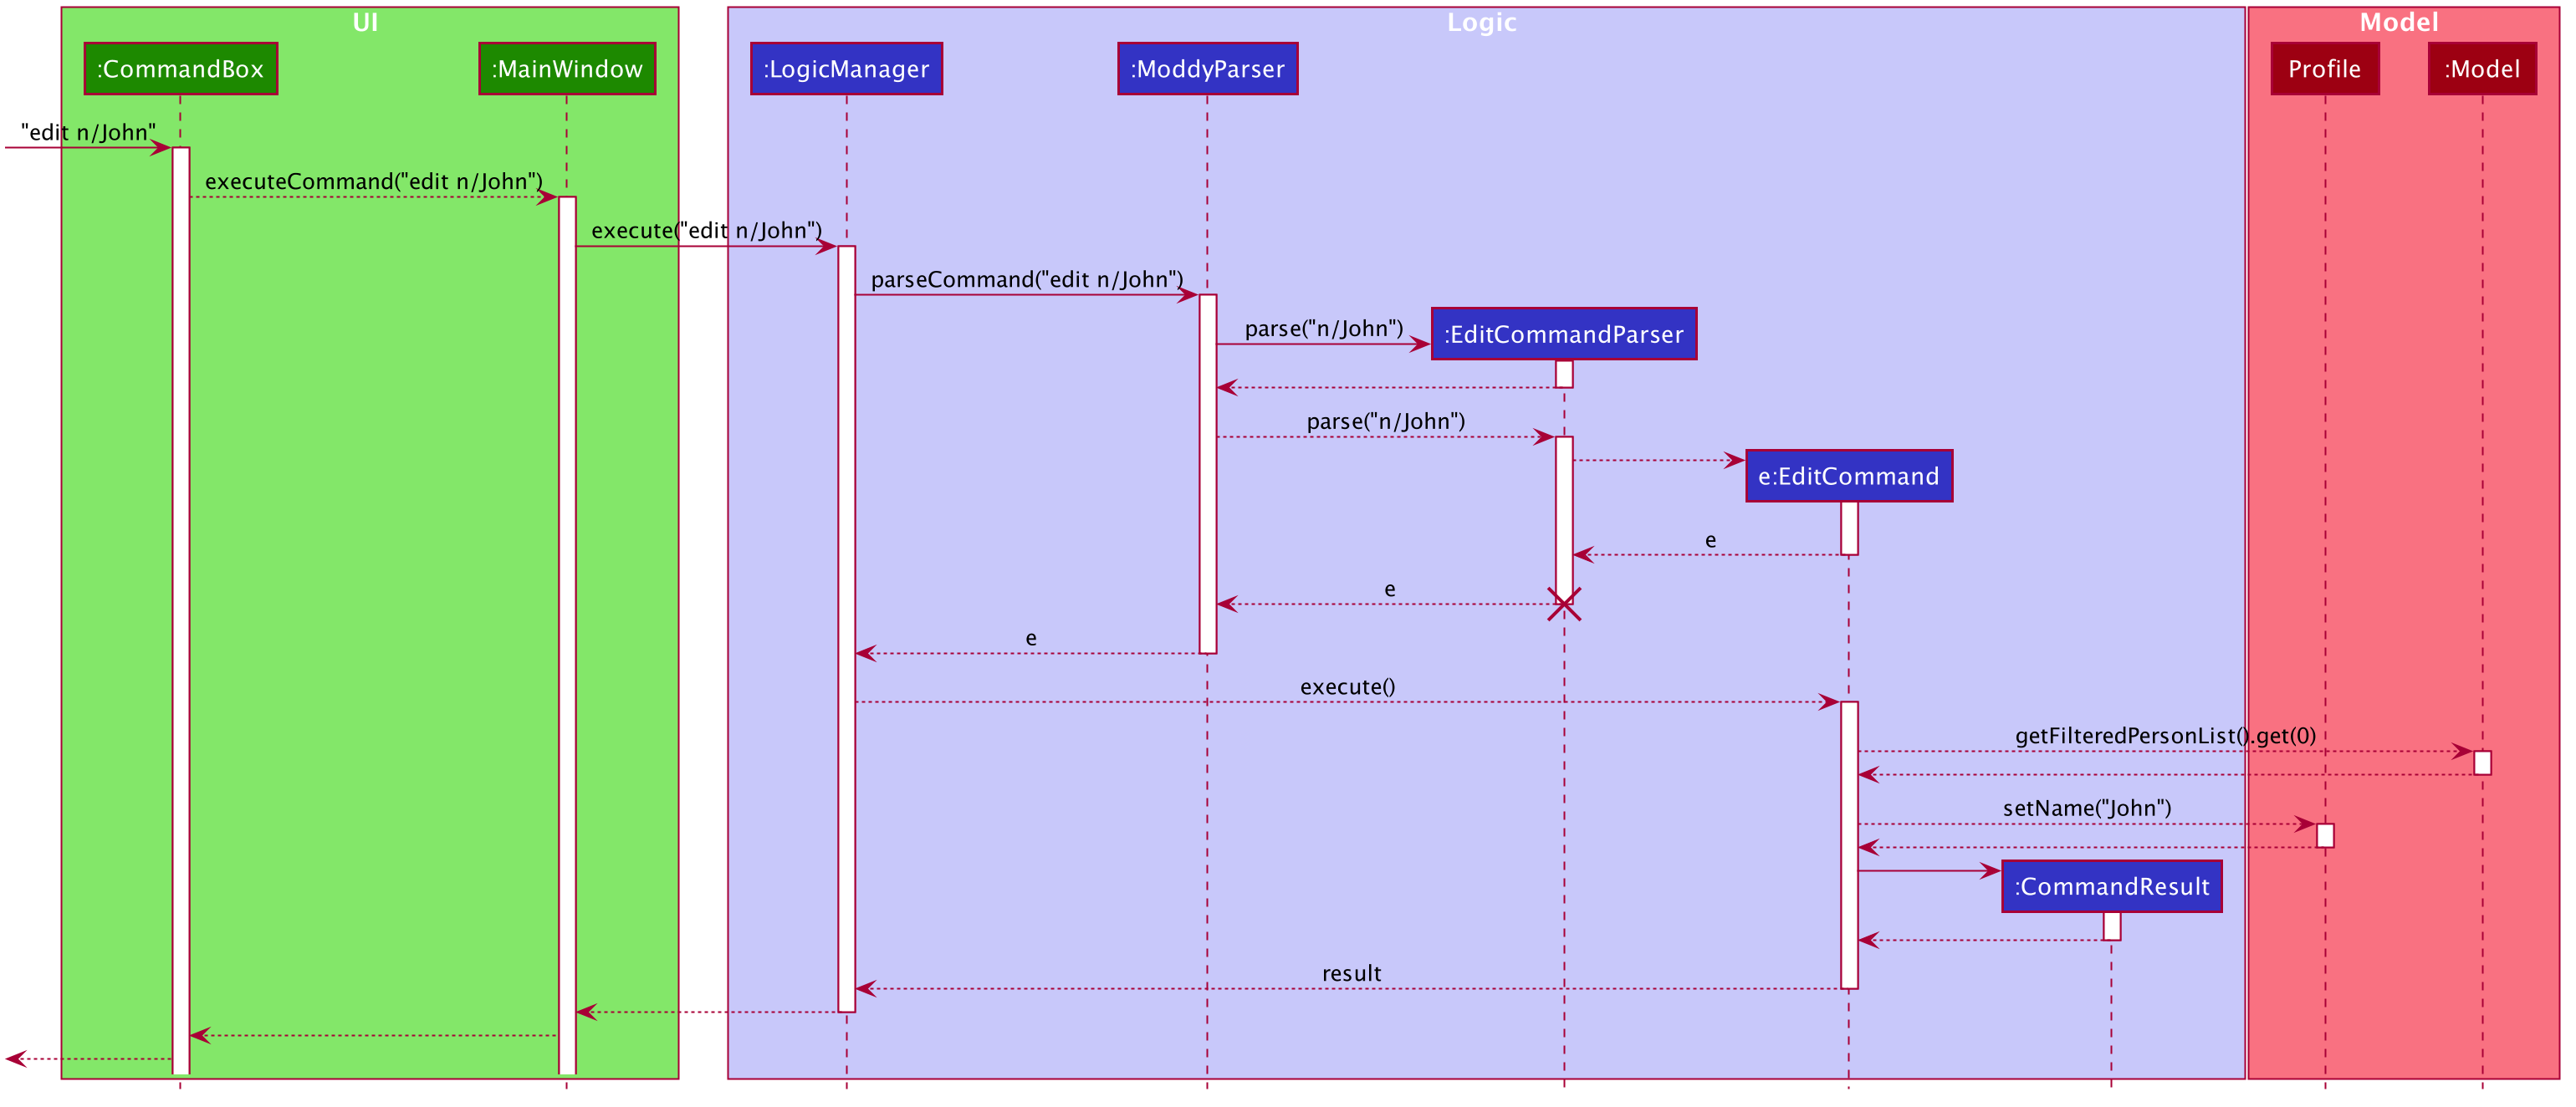
edit n/John Command4.5.2. Design Considerations
-
Alternative 1 (current choice): Edit
Profile,ModuleorDeadlinewith oneEditCommand-
Pros: Easier for the user as they will not have to remember different edit commands for different purposes.
-
Cons: More considerations to differentiate the intent of the user and there is more room for error.
-
-
Alternative 2: Have separate commands to edit
Profile,ModuleandDeadline-
Pros: Makes it clearer what the user intent is and is easier to parse.
-
Cons: Harder for the user to remember the commands and the user will not be allowed to edit both module details and deadline tasks within the module at the same time.
-
Eventually, we decided on alternative 1 due to the benefits of consistency. Additionally, by requiring a m/moduleCode field for the user to edit Module, it clearly shows the intent of the user, and whether the Profile or a Module should be edited.
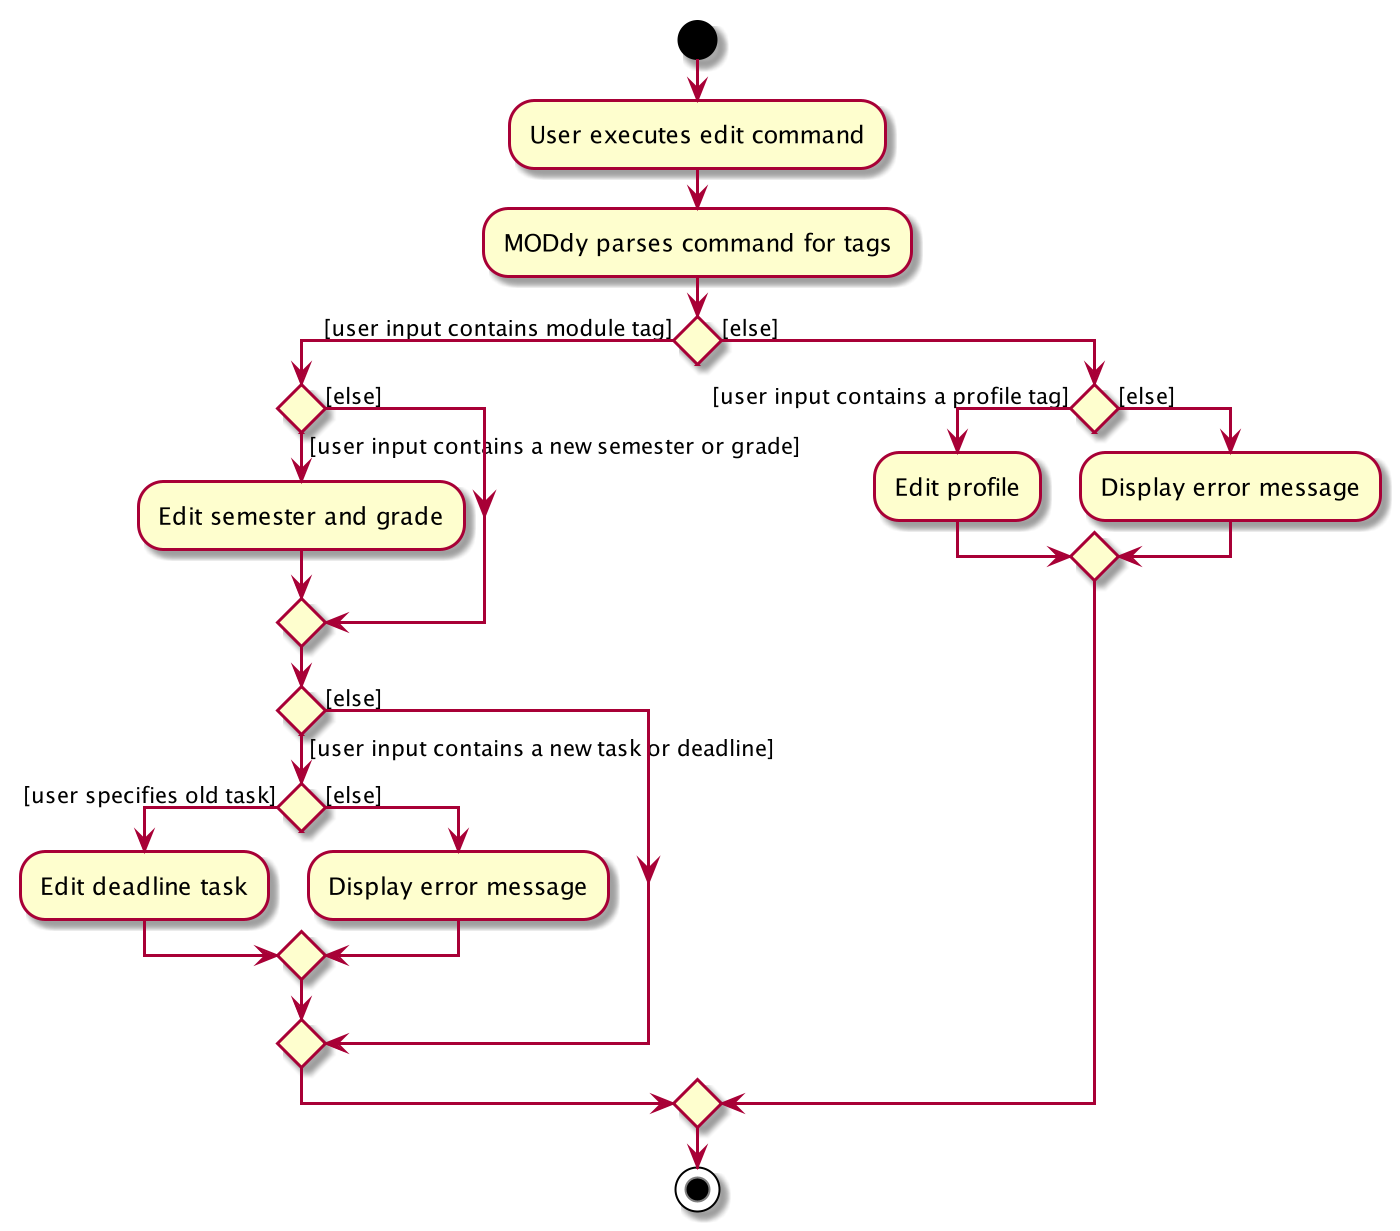
We also considered whether to allow users to edit the grade of a module that has yet to be taken. We eventually decided to allow that as many students may want to predict their CAP, which our CAP calculator will allow them to do.
The following activity diagram shows how the edit command decides what to edit (profile, module details or deadline task):
4.6. Show Profile / Module / Semester / Course / Focus Area Feature
The show feature allows the user to display information about a Profile, Module, Course, FocusArea or Semester with the command show, appended with the tags below. These information cannot be seen from the main UI and have to be displayed through the show command.
The tags are:
-
n/nameforProfile -
m/moduleCodeforModule -
c/courseforCourse -
f/focusAreaforFocusArea -
y/year.semesterforSemester
4.6.1. Current Implementations
ShowCommand extends from the Command class and uses the inheritance to facilitate the implementation. ShowCommand is parsed using ShowCommandParser to split the user input into relevant fields.
The following sequence diagram shows how the show command works: show n/John
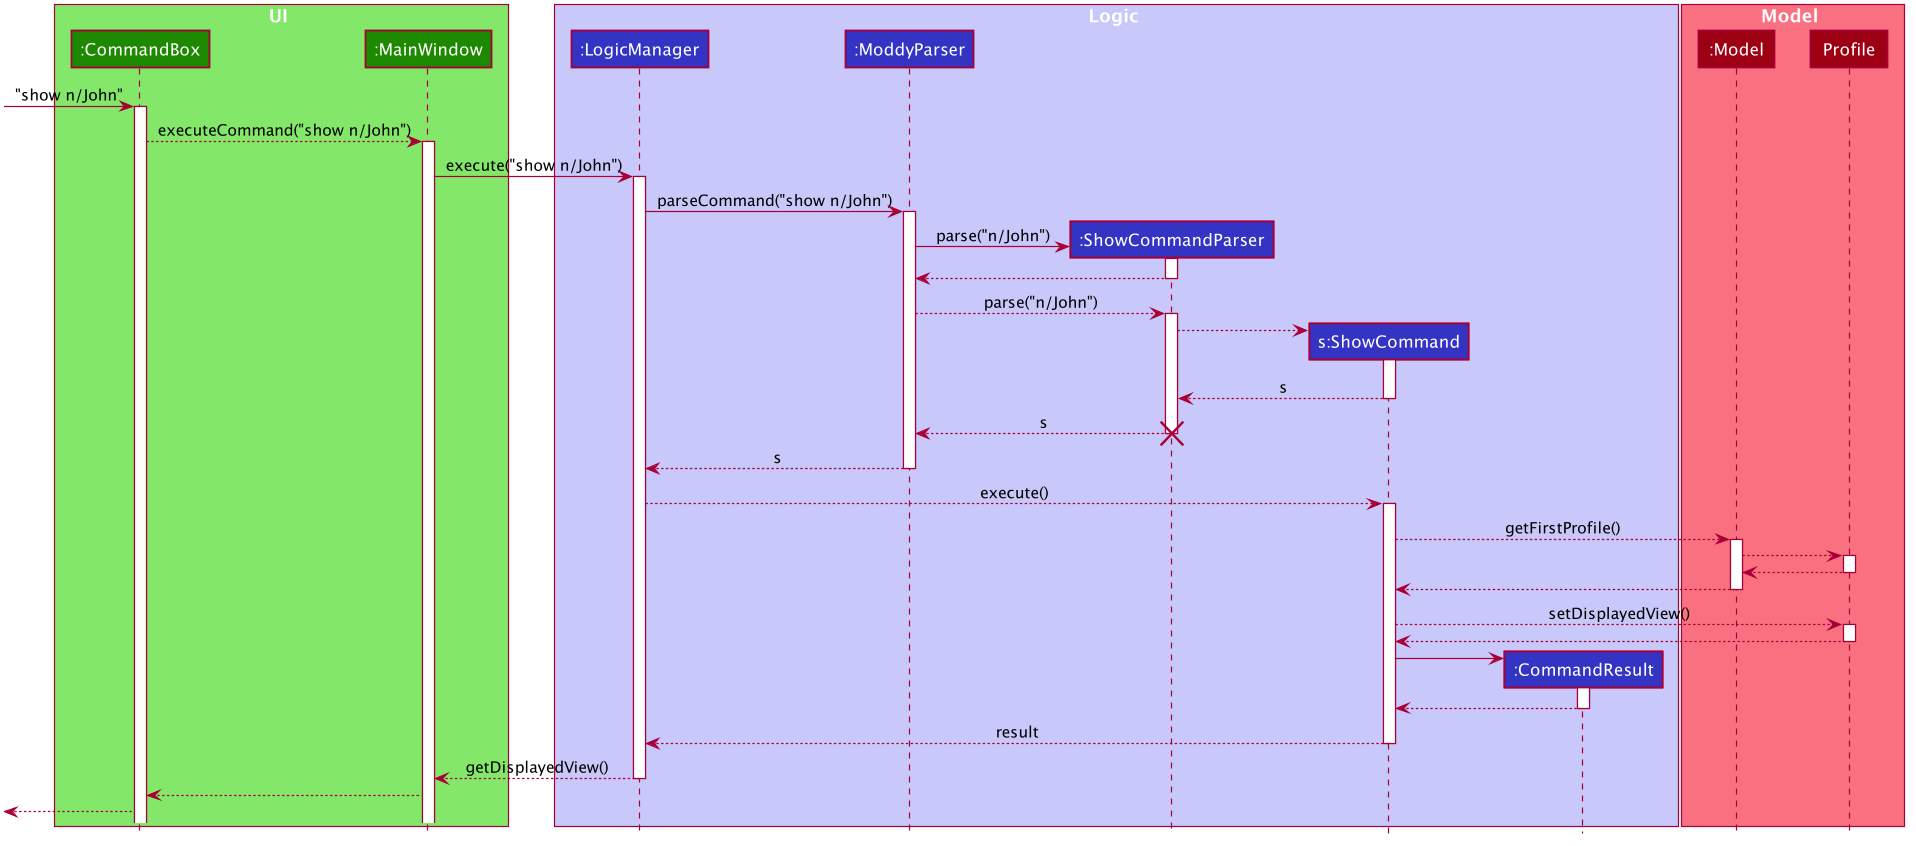
show n/John commandThe following activity diagram shows how the show operation works with input: show c/Computer Science
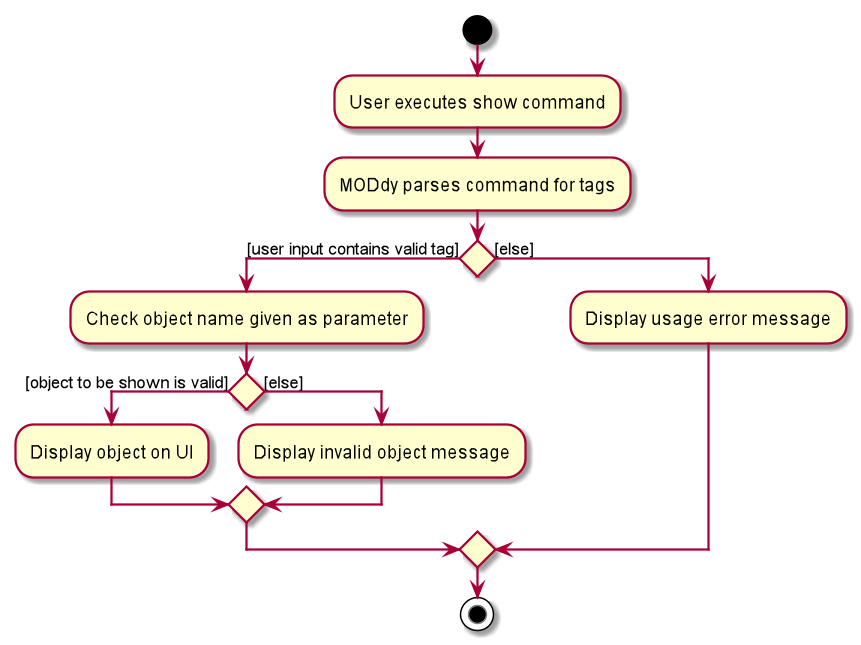
If more than one accepted tag is given, such as show c/Computer Science m/CS1101s, MODdy will not display anything and will instead give the user a message that only one tag should be provided.
|
4.6.2. Design Considerations
-
Alternative 1 (current choice): Have one
ShowCommandfor all objects to be displayed-
Pros: Repeated code is avoided
-
Cons: Takes in an
Objectin its constructor, anyObjectcan call this method and cause unintended usages
-
-
Alternative 2: Have a separate
ShowCommand(e.g.ShowModuleCommand,ShowCourseCommand) for each object shown-
Pros: Applies Single Level of Abstraction Principle (SLAP)
-
Cons: Too many classes having repeated code
-
Eventually, we decided on alternative 1 due to the benefits of avoiding repeated code. To tackle the cons from this, we implemented guard conditions to gracefully reject other objects that may unintentionally call this method.
4.7. Delete Profile / Module / Task / Grade Feature
The delete feature allows the user to delete a Profile, Module, Task or Grade with the command delete, appended with the tags.
The tags are:
-
n/namefor deleting aProfile -
m/moduleCodefor deleting aModule -
m/moduleCode t/taskfor deleting aTask -
m/moduleCode g/for deleting aGrade
Multiple modules can be deleted at once, e.g. delete m/CS1231 m/IS1103 m/MA1521.Multiple tasks can be deleted at once but only from the same module, e.g. delete m/CS1231 t/task t/exam.Multiple grades can be deleted at once, e.g. delete m/CS1231 m/IS1103 m/MA1521 g/.
|
4.7.1. Current Implementations
DeleteCommand extends from the Command class and uses the inheritance to facilitate the implementation. DeleteCommand is parsed using DeleteCommandParser to split the user input into relevant fields.
The following sequence diagram shows how the delete operation works with input: delete m/CS2101 t/work
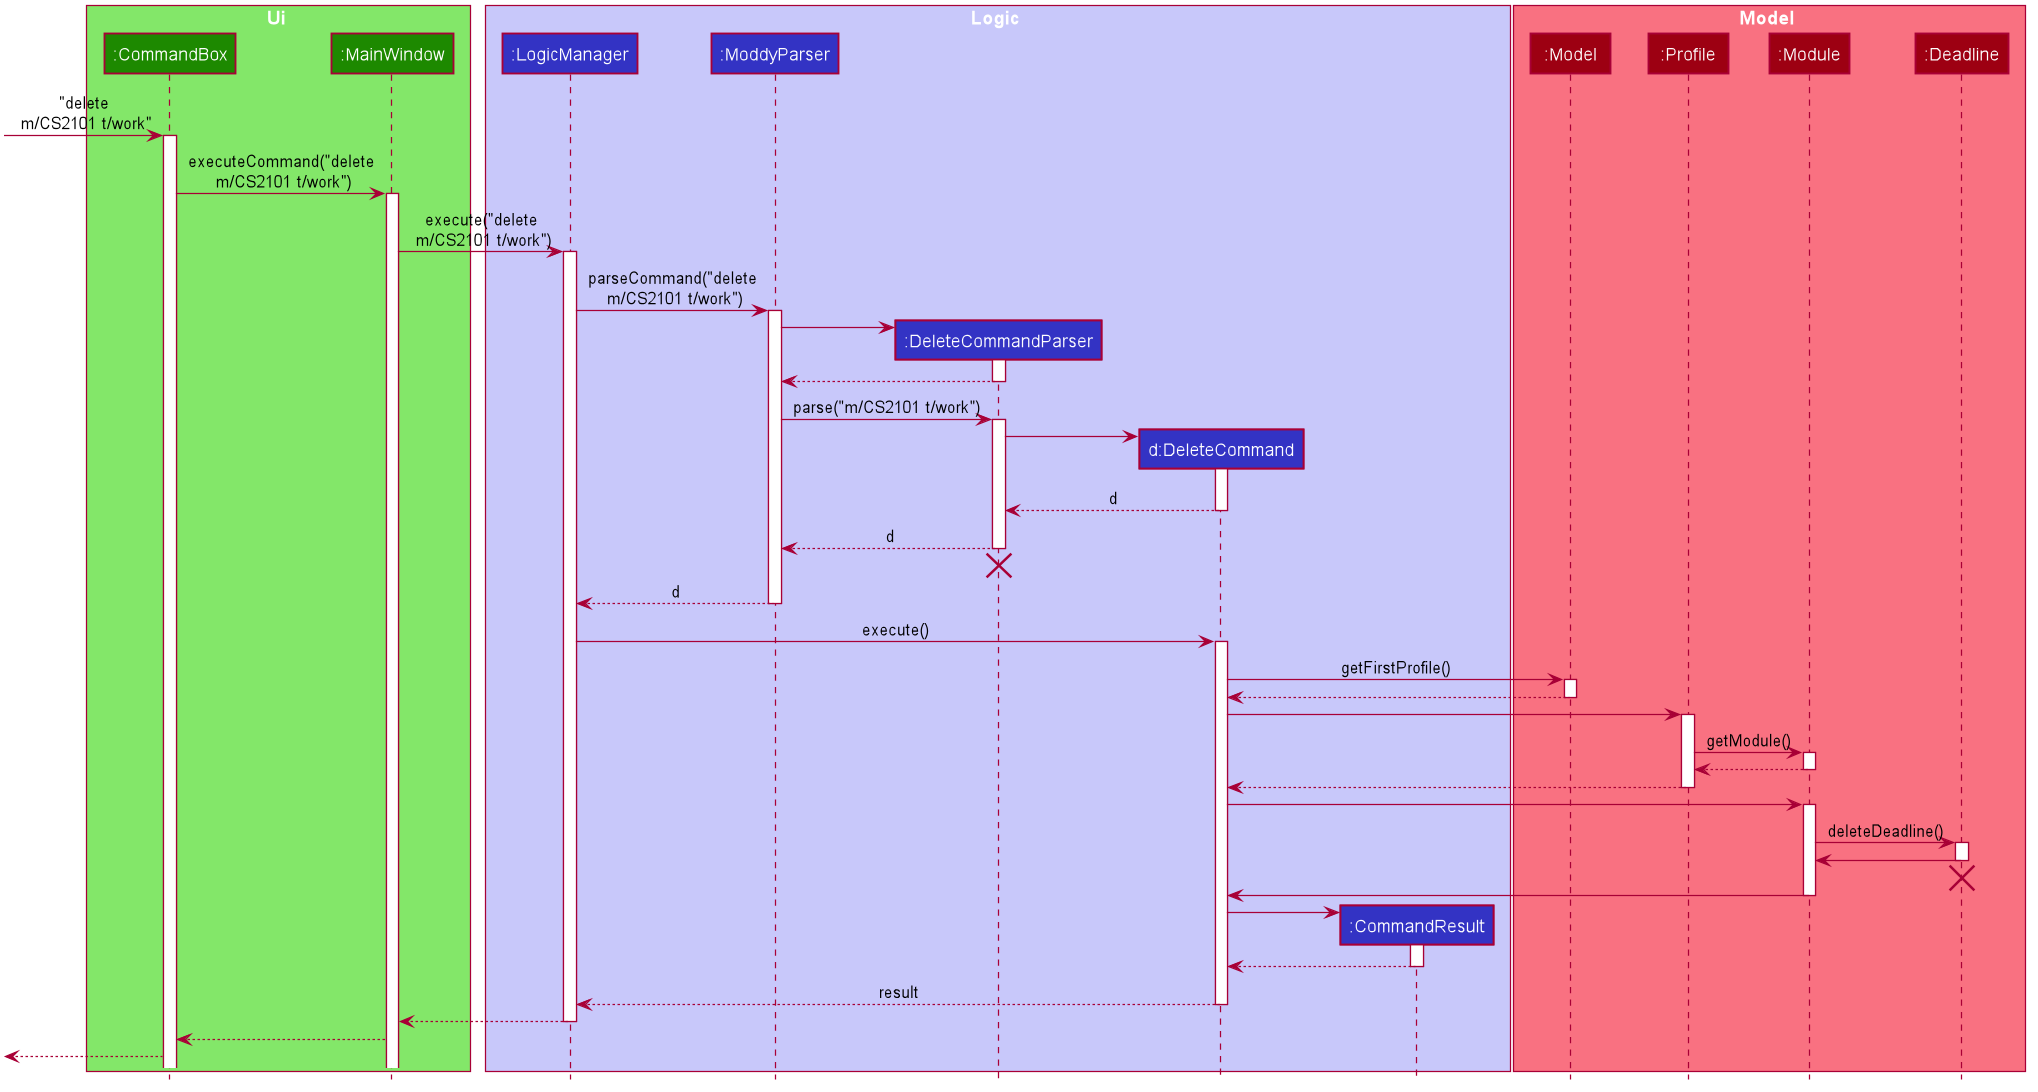
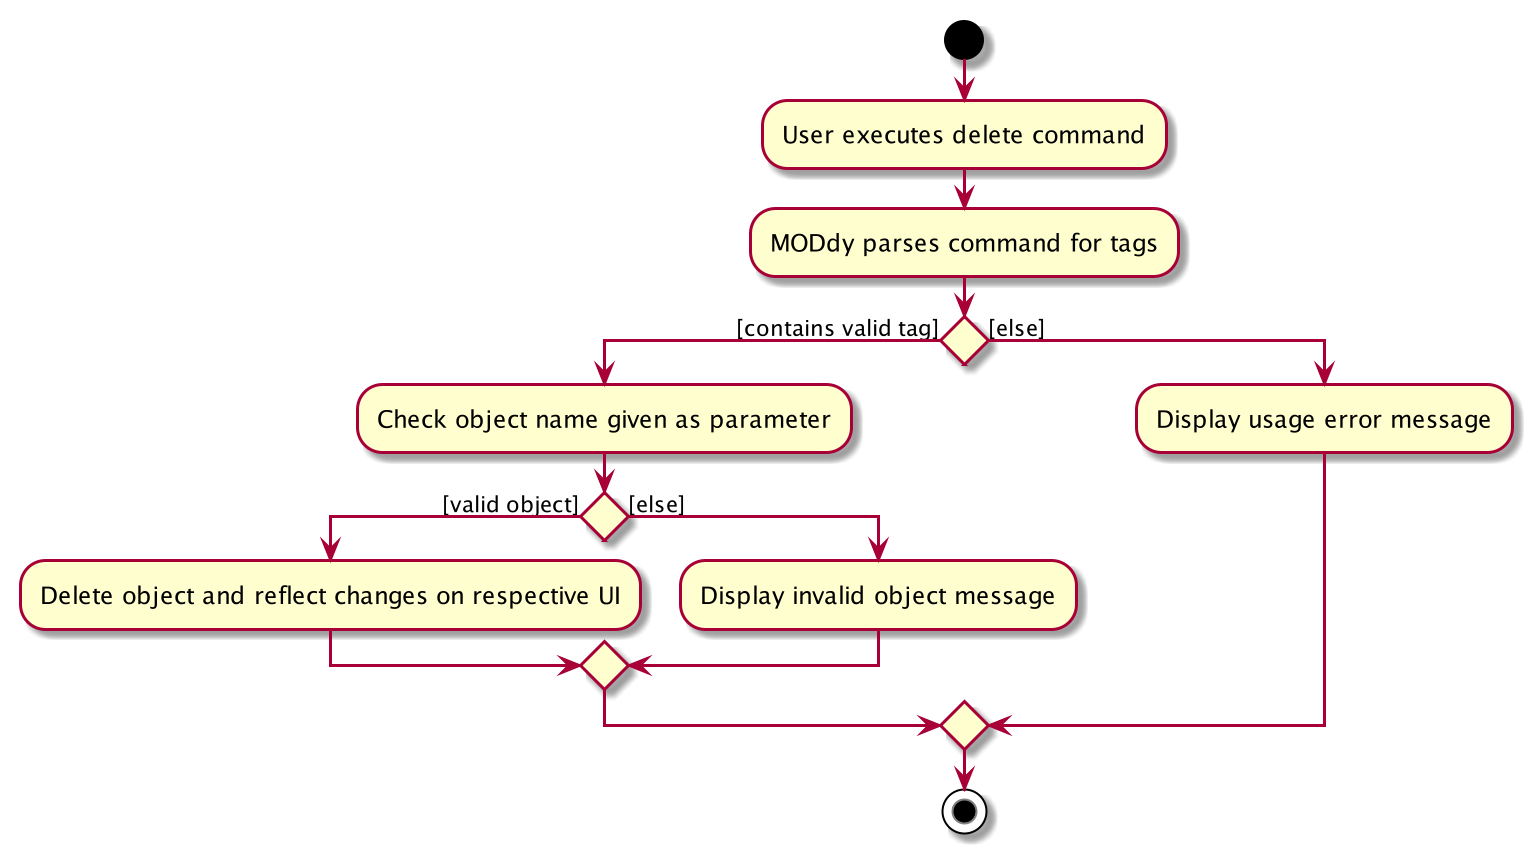
delete m/CS2101 t/work command.The following activity diagram shows how the show command decides what to show (profile, module details, semester, course, module or focus area):
4.7.2. Design Considerations
-
Alternative 1 (current choice): Delete multiple
ModuleorTaskobjects with oneDeleteCommand-
Pros: More convenient for users.
-
Cons: Inconsistent with deleting a
Profile, which can only take in at most oneProfile.
-
-
Alternative 2: Delete only one
ModuleorTaskobject with oneDeleteCommand-
Pros: Easier to implement and consistent with deleting
Profile. -
Cons: More to type if user intends to delete multiple
Moduleobjects orTaskobjects.
-
Eventually, we decided on alternative 1 to provide more convenience and flexibility to users.
4.8. Help Feature
The help feature allows the user to view the pop-up HelpWindow with the command help. This feature allows the user to have a
quick view of sample inputs if they run into trouble while using the application.
4.8.1. Current Implementations
HelpCommand extends from the Command class and uses the inheritance to facilitate the implementation.
4.8.2. Design Considerations
-
Alternative 1 (current choice):
HelpWindowexists as a pop-up window-
Pros: Easier for user to refer to while typing different commands in the
CommandBoxinMainWindow. -
Cons: As it exists as a separate window, it might cause hindrance for user when use MODdy.
-
-
Alternative 2:
HelpWindowappears inMainWindow-
Pros: Integral with the whole
MainWindow. -
Cons: The
HelpWindowmight be replaced by user input command, and user would have to enterhelpcommand again to view theHelpWindow.
-
Eventually, we decided on alternative 1 due to the benefits of allowing user to cross-reference the commands while using the application.
4.9. Home Feature
The home feature allows the user to return to the homepage.
4.9.1. Current Implementations
HomeCommand extends from the Command class and uses the inheritance to facilitate the implementation.
4.10. Logging
We are using java.util.logging package for logging. The LogsCenter class is used to manage the logging levels and logging destinations.
-
The logging level can be controlled using the
logLevelsetting in the configuration file (See Section 4.11, “Configuration”) -
The
Loggerfor a class can be obtained usingLogsCenter.getLogger(Class)which will log messages according to the specified logging level -
Currently log messages are output through:
Consoleand to a.logfile.
Logging Levels
-
SEVERE: Critical problem detected which may possibly cause the termination of the application -
WARNING: Can continue, but with caution -
INFO: Information showing the noteworthy actions by the App -
FINE: Details that is not usually noteworthy but may be useful in debugging e.g. print the actual list instead of just its size
4.11. Configuration
Certain properties of the application can be controlled (e.g user prefs file location, logging level) through the configuration file (default: config.json).
5. Documentation
Refer to the guide here.
6. Testing
Refer to the guide here.
7. Dev Ops
Refer to the guide here.
Appendix A: Product Scope
Target user profile:
-
is intending to enrol or currently enrolled in NUS as a Computing student
-
has a need to plan or keep track of degree progression, modules and/or module tasks
-
prefer desktop apps over other types
-
can type fast
-
prefers typing over mouse input
-
is reasonably comfortable using CLI apps
Value proposition: more convenient to manage degree progression and tasks than a typical mouse/GUI driven app
Appendix B: User Stories
Priorities: High (must have) - * * *, Medium (nice to have) - * *, Low (unlikely to have) - *
| Priority | As a … | I want to … | So that I can… |
|---|---|---|---|
|
Student |
plan for specialisations |
complete the requirements for my focus area |
|
Student |
see the overview of my degree progression |
|
|
Student |
choose modules to be taken |
plan for future academic semesters |
|
Student |
store my past grades |
calculate my overall CAP |
|
Student |
view prerequisites of every module |
know what modules I should complete early |
|
Student |
view preclusions of every module |
know what modules I cannot take |
|
Student |
maintain a list of unfinished homework and their deadlines |
submit my assignments on time |
|
Student |
edit my list of tasks |
make relevant changes if required |
|
Double degree student |
have a single platform to see both degrees' modules |
track my degree progression |
|
Student |
pool notes for my modules together |
organise my notes according to my modules |
Appendix C: Use Cases
(For all use cases below, the System is MODdy and the Actor is the user, unless specified otherwise)
Use case: UC01 - Add module
MSS
-
User requests to add a module for a particular semester.
-
User provides the module code for that module.
-
MODdy adds the module to that semester.
Use case ends.
Extensions
-
2a. The module code provided is typed wrongly.
-
2a1. MODdy prompts the user to provide a valid module code.
Use case ends.
-
-
3a. The user has not fulfilled the prerequisites of the module before the specified semester.
-
3a1. MODdy shows a warning that the module prerequisites have not been fulfilled prior to that semester.
-
3a2. MODdy adds the module to that semester.
Use case ends.
-
Use case: UC02 - View module
MSS
-
User requests to view a module.
-
User provides the module code for that module.
-
MODdy shows all information related to the module.
Use case ends.
Extensions
-
2a. The module code provided is typed wrongly.
-
2a1. MODdy prompts the user to provide a valid module code.
Use case ends.
-
Use case: UC03 - Add grades
MSS
-
User requests to update his results at the end of a semester.
-
User provides the alphabet grade for a module that was taken.
-
MODdy adds the alphabet grade to the module and updates overall CAP.
Use case ends.
Extensions
-
2a. The grade entered is invalid.
-
2a1. MODdy shows an error message.
Use case ends.
-
Use case: UC04 - View academic overview
MSS
-
User requests to view his academic overview.
-
MODdy shows a list of the modules he has taken, his grades and overall CAP.
Use case ends.
Extensions
-
1a. The user has not created a user profile.
-
1a1. MODdy shows an error message.
Use case ends.
-
Use case: UC05 - Add task
MSS
-
User requests to add a task with a deadline to a particular module.
-
User provides the task description and deadline.
-
MODdy displays the newly added task in the deadline pane.
Use case ends.
Extensions
-
1a. The user is not taking the specified module in the current semester.
-
1a1. MODdy shows an error message.
Use case ends.
-
-
2a. The format of the deadline provided is wrong.
-
2a1. MODdy shows an error message.
Use case ends.
-
Use case: UC06 - Edit task
MSS
-
User requests to edit the task description (shown in deadline pane) of a particular module.
-
User provides the new task description.
-
MODdy displays the updated task in the deadline pane.
Use case ends.
Extensions
-
1a. The user is not taking the specified module.
-
1a1. MODdy shows an error message.
Use case ends.
-
-
2a. The task description provided does not exist.
-
2a1. MODdy shows an error message.
Use case ends.
-
Appendix D: Non Functional Requirements
-
Should work on any mainstream OS as long as it has Java
11or above installed. -
A user with above average typing speed for regular English text (i.e. not code, not system admin commands) should be able to accomplish most of the tasks faster using commands than using the mouse.
-
Should be able to accommodate any user from the School of Computing in NUS.
-
Should work with or without Internet connection.
Appendix E: Glossary
Appendix F: Instructions for Manual Testing
Given below are instructions to test the app manually.
| These instructions only provide a starting point for testers to work on; testers are expected to do more exploratory testing. |
F.1. Launch and Shutdown
-
Initial launch
-
Download the jar file and copy into an empty folder with both read and write permissions granted.
-
Double-click the jar file.
Expected: Shows the GUI with a Quick Start page. The window size may not be optimum.
-
-
Saving window preferences
-
Resize the window to an optimum size. Move the window to a different location. Close the window.
-
Re-launch the app by double-clicking the jar file.
Expected: The most recent window size and location is retained.
-
F.2. Creating a new profile
-
Creating a new profile while at Quick Start page
-
Prerequisites: Currently at the Quick Start page. No profiles created.
-
Test case:
new n/john y/2.2 c/computer science f/computer security
Expected: Details of the new profile are shown in the profile panel. Name of the new profile shown in the status message. -
Test case:
new n/john y/2.2 c/computer science
Expected: Details of the new profile are shown in the profile panel. Focus area is shown asUNDECIDED. Name of the new profile shown in the status message. -
Test case:
new n/john y/2.2
Expected: No profile is created. Error details shown in the status message. All panels remain the same. -
Other incorrect new commands to try:
new n/john y/2.2 c/abc,new n/john y/2.x c/computer science(where x is larger than 2),new n/john& y/2.1 c/computer science
Expected: Similar to previous.
-
F.3. Deleting a profile
-
Deleting a profile while all modules are listed
-
Prerequisites: Profile with name
johnhas been created. Multiple modules in multiple semesters shown in the overview. View all modules using theshow n/johncommand. -
Test case:
delete n/john
Expected: Main window changes from the overview panel to the Quick Start page shown at start up. Profile panel becomes empty. Status message mentions that the profile list has been cleared. -
Test case:
delete n/tom
Expected: No profile is deleted. Error details shown in the status message. All panels remain the same. -
Other incorrect delete commands to try:
delete,delete x(where x is a number),delete n/john y/1.1,delete n/john c/computer science
Expected: Similar to previous.
-
F.4. Adding a module
-
Adding a module while all modules are listed
-
Prerequisites: Profile with name
johnhas been created. View all modules using theshow n/johncommand. -
Test case:
add m/CS1010 y/1.1
Expected: ModuleCS1010appears in overview panel underYEAR 1 SEMESTER 1. Grade of module is shown as-. Module code of added module shown in status message. Profile panel remains the same. -
Test case:
add m/CS1010 y/1.1 g/A
Expected: Similar to previous, except that grade ofCS1010is shown asA. -
Test case:
add m/CS1010
Expected: No module is added. Error details shown in the status message. All panels remain the same. -
Other incorrect add commands to try:
add,add y/1.1,add m/CS1010 y/
Expected: Similar to previous.
-
F.5. Deleting a module
-
Deleting a module while all modules are listed
-
Prerequisites: Profile with name
johnhas been created. The moduleCS1010has been added and the moduleCS1231has NOT been added. View all modules using theshow n/johncommand. -
Test case:
delete m/CS1010
Expected: ModuleCS1010is deleted from the overview panel. Module code of deleted module shown in status message. Profile panel remains the same. -
Test case:
delete m/CS1231
Expected: No module is deleted. Error details shown in the status message. All panels remain the same. -
Other incorrect delete commands to try:
delete m/CS1111,delete m/CS101,delete m/
Expected: Similar to previous.
-
F.6. Adding a deadline
-
Adding a deadline
-
Prerequisites: Profile has been created. For the current semester, the module
CS1010has been added and the moduleCS1231has NOT been added. -
Test case:
add m/CS1010 t/work d/2020-10-10 22:00
Expected: Deadline with module codeCS1010, taskwork, date10 October 2020and time22:00is added to the deadline panel. Module codeCS1010appears in status message. Profile panel and overview panel remains the same. -
Test case:
add m/CS1010 t/work
Expected: Similar to previous, except that date and time fields of the deadline are shown as-. -
Test case:
add m/CS1010 t/work d/2020-10-40 22:00
Expected: No deadline is added. Error details shown in the status message. All panels remain the same. -
Other incorrect add commands to try:
add m/CS1010 d/2020-10-10 22:00,add m/CS1231 t/work d/2020-10-10 22:00
Expected: Similar to previous.
-
F.7. Deleting a deadline
-
Deleting a deadline
-
Prerequisites: Profile has been created. The module
CS1010has been added to the current semester. For this module, a deadline with taskworkhas been added and a deadline with tasktesthas NOT been added. -
Test case:
delete m/CS1010 t/work
Expected: Deadlineworkis deleted from the deadline panel. Module codeCS1010and taskworkappears in status message. Profile panel and overview panel remains the same. -
Test case:
delete m/CS1010 t/test
Expected: No deadline is deleted. Error details shown in the status message. All panels remain the same. -
Other incorrect delete commands to try:
delete m/CS1010 t/work d/2020-10-10 22:00,delete m/CS1010 t/test
Expected: Similar to previous.
-
F.8. Setting the grade of a module
-
Setting the grade of an existing module while all modules are listed
-
Prerequisites: Profile with name
johnhas been created. The moduleCS1010has been added and the moduleCS1231has NOT been added. View all modules using theshow n/johncommand. -
Test case:
edit m/CS1010 g/A
Expected: In the overview panel, the grade field ofCS1010is shown asA. The current CAP is updated to reflect the latest CAP. Module codeCS1010appears in the status message. The other panels remain the same. -
Test case:
edit m/CS1010 g/X
Expected: No grade is edited. Error details shown in the status message. All panels remain the same. -
Other incorrect edit commands to try:
edit m/CS1010 g/1,edit m/CS1231 g/A
Expected: Similar to previous.
-
F.9. Deleting the grade of a module
-
Deleting the grade of an existing module while all modules are listed
-
Prerequisites: Profile with name
johnhas been created. The moduleCS1010has been added with gradeAand the moduleCS1231has NOT been added. View all modules using theshow n/johncommand. -
Test case:
delete m/CS1010 g/
Expected: In the overview panel, the grade field ofCS1010is shown as-. The current CAP is updated to reflect the latest CAP. Module codeCS1010appears in the status message. The other panels remain the same. -
Test case:
delete m/CS1231 g/
Expected: No grade is deleted. Error details shown in the status message. All panels remain the same.
-
F.10. Editing the name of a profile
-
Editing the name of an existing profile
-
Prerequisites: Profile with name
johnhas been created. -
Test case:
edit n/tom
Expected: In the profile panel, the name has been changed fromJOHNtoTOM. All other fields in the existing profile remain the same. -
Test case:
edit n/tom&
Expected: Name of profile is not modified. Error details shown in the status message. All panels and fields of profile remain the same.
-
F.11. Editing the course of a profile
-
Editing the course of an existing profile
-
Prerequisites: Profile with name
johnhas been created with coursecomputer science. -
Test case:
edit n/john c/business analytics
Expected: In the profile panel, the course has been changed fromCOMPUTER SCIENCEtoBUSINESS ANALYTICS. All other fields in the existing profile remain the same. -
Test case:
edit n/john c/course
Expected: Course of profile is not modified. Error details shown in the status message. All panels and fields of profile remain the same.
-
F.12. Editing the focus area of a profile
-
Editing the focus area of an existing profile
-
Prerequisites: Profile with name
johnhas been created with focus areacomputer security. -
Test case:
edit n/john f/artificial intelligence
Expected: In the profile panel, the focus area has been changed fromCOMPUTER SECURITYtoARTIFICIAL INTELLIGENCE. All other fields in the existing profile remain the same. -
Test case:
edit n/john c/course
Expected: Focus area of profile is not modified. Error details shown in the status message. All panels and fields of profile remain the same.
-
F.13. Editing the semester of a module
-
Editing the semester of an existing module
-
Prerequisites: Profile with name
johnhas been created. The moduleCS1010has been added to year 1 semester 1 but the moduleCS1231has NOT been added to any semester. View all modules using theshow n/johncommand. -
Test case:
edit m/CS1010 y/1.2
Expected: In the overview panel, the moduleCS1010moves from year 1 semester 1 to year 1 semester 2. -
Test case:
edit m/CS1231 y/1.2
Expected: Semester of the module is not modified. Error details shown in the status message. All panels remain the same.
-
F.14. Editing a task of a module
-
Editing the name of a task of a module
-
Prerequisites: Profile has been created. The module
CS1010has been added with one deadline namedwork. -
Test case:
edit m/CS1010 t/work nt/exam
Expected: In the deadline panel, the name of the taskworkunder moduleCS1010is changed toexam. -
Test case:
edit m/CS1010 t/midterm nt/exam
Expected: Name of the task is not modified. Error details shown in the status message. All panels remain the same.
-
F.15. Showing module overview
-
Showing the module overview throughout all semesters.
-
Prerequisites: Profile with name
johnhas been created. -
Test case:
show n/john
Expected: The overview panel is shown with all the added modules. -
Test case:
show n/tom
Expected: User interface does not change. Error details shown in the status message. All panels remain the same.
-
F.16. Showing semester overview
-
Showing the module overview for a particular semester
-
Prerequisites: Profile has been created. The module
CS1010has been added to year 1 semester 1. No modules have been added to year 1 semester 2. -
Test case:
show y/1.1
Expected: ModuleCS1010and its title appears in the overview panel. -
Test case:
show y/1.2
Expected: User interface does not change. Error details shown in the status message.
-
F.17. Showing module information
-
Showing the information (description, prerequisites, preclusions, etc) of a module
-
Test case:
show m/CS1010
Expected: The module information is shown in the overview panel. -
Test case:
show m/CS1111
Expected: User interface does not change. Error details shown in the status message.
-
F.18. Showing course information
-
Showing the information (course requirements, focus areas) of a course
-
Test case:
show c/computer science
Expected: The course requirements and focus areas of Computer Science are shown in the overview panel. -
Test case:
show c/course
Expected: User interface does not change. Error details shown in the status message.
-
F.19. Showing focus area information
-
Showing the information (modules in primaries and electives) of a focus area
-
Test case:
show f/computer security
Expected: The modules in Area Primaries and Electives of Computer Security are shown in the overview panel. -
Test case:
show f/focus area
Expected: User interface does not change. Error details shown in the status message.
-
F.20. Returning to home screen
-
Returning to the home screen
-
Prerequisites: The Quick Start page is not shown in the overview panel.
-
Test case:
home
Expected: The Quick Start page is shown in the overview panel.
-
F.21. Resetting MODdy
-
Clears all user information inside MODdy, including user profile, modules taken and deadlines.
-
Prerequisites: Profile has been created.
-
Test case:
clear
Expected: The Quick Start page is shown in the overview panel. Profile panel and deadline panel becomes empty.
-
F.22. Saving data
-
Dealing with missing/corrupted data files
-
Test case: Delete the file named
userProfiles.jsonin thedatafolder, relative to the path of the jar file. Launch the app by double-clicking the jar file. Expected: Shows the GUI with a Quick Start page. -
Test case: Edit the file named
userProfiles.jsonin thedatafolder such that it does not contain valid JSON. This can be done by removing the curly bracket on the first line of the file. Launch the app by double-clicking the jar file. Expected: Shows the GUI with a Quick Start page.
-
Appendix G: Effort
In this section, we highlight the amount of effort took for us to develop MODdy, the challenges faced in this development and our eventual achievement.
G.1. Overall effort
Estimated effort: 16
The above estimated effort uses Address Book 3 (AB3) as a base estimation of 10 for effort taken.
In short, AB3 essentially stores data related to multiple persons. MODdy does that for one, but does much more. MODdy is able to store data for a user such as their course, focus areas and personal information of their modules, be it in the past, present or future.
There was a considerable amount of time spent throughout the construction of MODdy. We had to figure out how different courses and modules could be linked to each other in MODdy. We also had to plan out features that could allow users to make this course and module management application more personal. Features were not just implemented immediately, but significant considerations were taken to decide whether it was consistent with the other features that MODdy offered.
Feature implementation was also not just a single point of discussion. New features required edits to other features to maintain consistency, while some required even newer features to complement it. All these discussions were held at least once a week for a minimum of 2 hours each round to ensure that we were in sync with each others' work.
However, we also understand that AB3 has certain code classes that are complicated to build and these classes were also reused in MODdy. Examples of these reused classes are found in the commons package, while MODdy-specific classes such as JsonSerializableCourseList, JsonCourseListStorage and JsonCourse were implemented with heavy reference to original AB3 classes. Hence, the estimated effort was scaled back slightly.
G.2. Challenges faced
Ultimately, the biggest challenge was getting the User Interface (UI) of MODdy to be exactly as we envisioned. This UI was new and completely different from the existing AB3 UI, and this meant that we had to write entirely new code in an area which we were unfamiliar with. As a group of relatively inexperienced programmers, our prior application-building experiences were mostly limited to command-line interface applications. As such, implementing MODdy without any points of reference posed a huge challenge.
Another challenge was having to overcome issues and bugs that our new features brought. Manual testing took a significant amount of time, ensuring positive tests worked as they should, while we also had to design extensive negative tests to cover as many situations of undesired input as we could.
G.3. Achievements
MODdy turned out to be the best version of the MODdy that we had planned for in the first place. Initially, we scaled back on the number of features due to the difficulties faced during implementation, for fear of a lack of time. However, we were able to scale back up our efforts after overcoming difficulties and bugs faced, to bring back the initially planned features.
We are satisfied with the latest release version of MODdy as it is able to perform what we wanted it to do in the first place, to be a one-stop application for personal course and module management in NUS.